Thursday 31 May 2012

Dark Chocolate Brownies with Peanut Butter Frosting

Pin It


A thick, fudgy and chewy dark chocolate brownie topped with a light and fluffy peanut butter frosting. Are you intrigued yet? I don't know about you, but I absolutely adore peanut butter and chocolate. It's an adoration bordering on obsession, to be honest. I combine peanut butter and chocolate wherever I can: dipping my Oreos in peanut butter, swirling peanut butter into my chocolate ice cream, and slathering peanut butter on chocolate muffins: these ones, for example. The list goes on. It's true love, people.

These are slightly akin to the Peanut Butter Swirl Brownies I made, but instead of a peanut butter swirl baked into the brownies, the peanut butter is incorporated into a smooth and fluffy frosting that sits on top of the brownies. The frosting is super simple, too. All you do is cream the butter and peanut butter and then add the powdered sugar. If you have any fleur de sel (or any other flaky salt), I think adding that to the top of these brownies would be awesome, and would create a great sweet-and-salty combination.

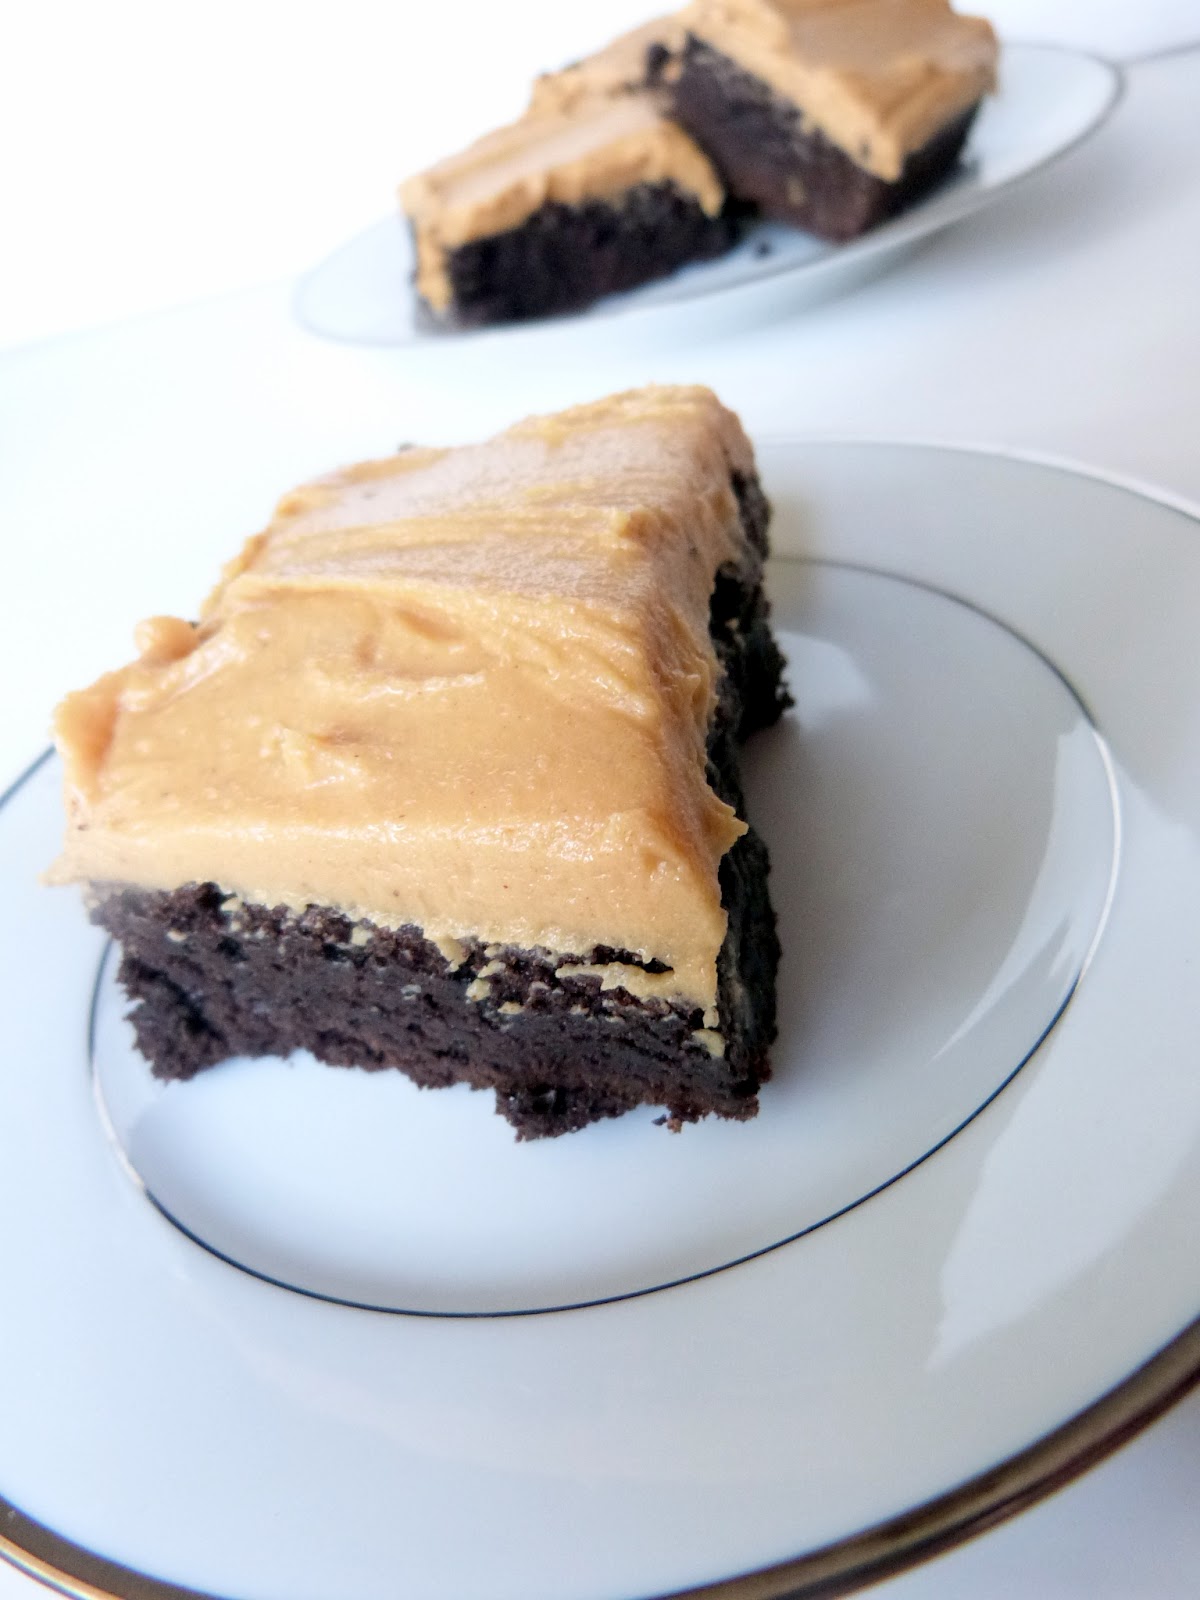
These brownies were awesome! The brownies themselves aren't too sweet due to the use of Hershey's Special Dark cocoa powder-- if you only have regular cocoa powder, however, feel free to use that. The use of Dark cocoa powder doesn't create that bitter flavour that (I find) dark chocolate often has.The brownies on their own are amazing: chewy and slightly dense, with that perfect crackly top. My little sisters wanted to eat just the brownies sans frosting, and they adored these. With the frosting, however, they're just phenomenal. The fudgy chewiness of the brownie combined with the light and fluffy peanut butter icing is just out of this world! If you're a lover of the chocolate-peanut butter combo, these are the brownies for you.


Dark Chocolate Brownies with Peanut Butter Frosting

Brownies:
  • 1 cup all purpose flour
  • 1 cup cocoa powder (I used 2/3 cup Hershey's Special Dark, and 1/3 cup natural cocoa powder)
  • 1 teaspoon kosher salt
  • 1/2 teaspoon baking powder
  • 2 pinches baking soda
  • 1 cup (2 sticks) unsalted butter
  • 2 cups granulated sugar
  • 2 tablespoons light corn syrup
  • 4 large eggs, at room temperature
  • 2 tablespoons vanilla extract
  1. Preheat the oven to 350 degrees F. Grease a 9x13 baking pan. (I also recommend lining the pan with aluminum foil so it hangs off the sides of the pan. This will allow you to take the entire brownie out of the pan, making it easier to frost. Line the pan with foil before greasing, and then grease the foil and pan.)
  2. In a medium bowl, whisk together the flour, cocoa, salt, baking powder, and baking soda.
  3. In a large saucepan, melt the butter. Remove the pan from the heat, and whisk in the sugar and corn syrup. Add in the eggs one at a time, whisking until well combined. In a very small bowl, stir together the vanilla extract and the coffee/espresso powder until it dissolves. Stir this into the liquid mixture in the pan. Add the dry ingredients into the pan as well, and fold with a spatula until the flour has been incorporated.
  4. Pour the batter into the pan, smooth the tops with your spatula, and bake them on the middle rack of your oven for about 30-35 minutes, until a toothpick inserted in the center comes out mostly clean. Let the brownies cool completely before frosting.
Peanut Butter Frosting:
  • 12 tablespoons (1½ stick) softened butter
  • 1½ cup peanut butter
  • 2 cups powdered sugar
  1. Cream the butter and the peanut butter until combined (I used a hand mixer, but feel free to use a standing mixer). Slowly stir in the powdered sugar until completely incorporated. Spread over the cooled brownies. 
Brownie recipe adapted from Jane's Sweets.
Frosting recipe adapted from Not Without Salt.

Pin It

Monday 28 May 2012

Double Chocolate Banana-Zucchini Muffins

Pin It


Making these double chocolate muffins was actually a bit of an accident. They were supposed to be the original chocolate chip zucchini muffins from Allrecipes. In the middle of mixing my ingredients, however, I realised I only had milk chocolate chips instead of the semi-sweet called for in the recipe. Since I had already added the sugar, I was worried that my muffins would be too sweet with the milk chocolate. So I decided to add some cocoa powder to cancel out a bit of the sweetness. And it turned out to be a great idea! These muffins aren't too sweet but still have a great chocolate flavour. I'm in love with them!

These muffins are actually healthy-- if you replace the oil with mashed banana (like I did), the muffins contain no oil or butter. I recommend substituting the oil for banana as it adds a spongier texture (which I love) and the slightest hint of banana flavour. My little sister who's insanely picky and hates bananas loved these muffins! If you are seriously against bananas, however, (or dislike spongy textures in baking), feel free to substitute the banana for vegetable oil.

Since they have banana and zucchini, they're healthy enough for breakfast, right? And it's okay to justify eating three of them in one sitting as well, right? Because these are seriously addictive. They're light enough for a guilt-free snack, but are still really really delicious. I'll be making these muffins again and again.


Double Chocolate Zucchini Muffins
Yield: 12 muffins
  • 1½ cups all-purpose flour
  • 3/4 cup sugar
  • 1 teaspoon baking soda
  • 1 teaspoon ground cinnamon
  • 1½ tablespoon cocoa powder
  • 1/2 teaspoon salt
  • 1 egg, lightly beaten
  • 1/2 cup mashed banana (approx. 1 whole banana)
  • 1/4 cup milk (I used skim)
  • 1 tablespoon lemon juice (I didn't have any on hand, so I substituted apple cider vinegar)
  • 1 teaspoon vanilla extract
  • 1 cup shredded zucchini
  • 1/2 cup chocolate chips (I used milk chocolate)
  1. Preheat oven to 350 degrees F.
  2. In a bowl, combine the first six (dry) ingredients. In a separate bowl, combine the egg, mashed banana, milk, lemon juice (or apple cider vinegar), and vanilla; mix well.  Stir into dry ingredients until just moistened. Fold in zucchini and chocolate chips. 
  3. Fill greased or paper-lined muffin tins until two-thirds full.
  4. Bake muffins for 20-25 minutes, or until a toothpick comes out clean.
Recipe adapted from Allrecipes.

Pin It

Friday 25 May 2012

Homemade Baked Beans

Pin It


I love, love, love baked beans-- but only the homemade kind! My grandma first made these for me last year, and I was obsessed with them. After I "grew up" I'd never been a fan of the canned beans, but when I tried my grandma's homemade recipe, I was blown away. These beans are kinda smoky and kinda sweet due to the bacon, ketchup and molasses. I love this recipe-- it's awesome.

I'm making these beans for a barbeque I'm going to for Memorial Day. I know the recipe looks daunting since the beans have to soak overnight and take so long to cook, but it's really simple and hands-off. All you do is combine the ingredients and throw it in the oven! Just make sure to keep checking the beans so you can add water as needed and keep them moist.
If you're going to a barbeque for Memorial Day (or Victoria Day, if you're Canadian like me!), I totally recommend this recipe! Everyone will be impressed :)

Homemade Baked Beans
Yield: 5-7 servings (as a side dish)
  • 1 pound (2½ cups) white navy beans
  • ½ pound bacon (preferably maple), cut into one-inch slices
  • 1½ cup onions, chopped
  • 1 cup ketchup
  • 1/3 cup good maple syrup (only quality maple syrup! not mrs. butterworth. if you don't have access to good, non-sugary maple syrup, simply omit.)
  • 1 tablespoon dry mustard
  • 2-3 cloves of garlic
  • 2 tablespoons molasses
  • dash salt and pepper
  1. In a large Dutch oven, cover the navy beans with cold water (cover the beans so that there's about an inch or so of water above the beans). Soak overnight
  2. After the beans have soaked, preheat the oven to 350 degrees F. 
  3. Combine all the ingredients except the beans in a medium size bowl. Pour into the Dutch oven with the beans. Cover the beans with 4-5 cups of water. 
  4. Bake the beans for about 2-3 hours (or until tender). As the beans cook, keep checking them to see if they have dried up and need more water. I add a cup of water at a time, about every hour or so.
    Pin It

    Thursday 17 May 2012

    Healthy Chocolate Mousse Pie

    Pin It


    I actually don't like pie. I hate pie crust, as I do most flaky pastry-type things. I don't like cooked fruit. I'm picky, I know. But one thing I do love? Chocolate pie! (As long as there is no traditional pie crust, of course.) I love all types of chocolate pie: chocolate pecan pie, chocolate fudge pie... but my favourite is chocolate mousse pie. I love chocolate mousse: it's so light and silky, but still has that intense chocolate flavour.

    A light, fluffy chocolate mousse sitting in a crunchy graham cracker crust.  The mousse is silky and chocolatey, but not overly dense or rich. Just a perfect mousse pie. Yes, this pie is healthy. It's relatively low in sugar and high in protein. It can be lactose-free (with some tweaking, which I will note in the recipe below) and gluten-free (if you use Chocolate-Covered Katie's recipe for an easy chocolate pie crust). All this might scare you away, but believe me, this pie is delicious. It has been tested by one of the pickiest kids I know: my 9-year-old sister. She approved! So what's the secret? Tofu! This may sound gross, but believe me, no one will know it has tofu in it. Tofu simply takes on the flavours of whatever you make with it. In this case, the tofu takes on the flavour of the melted chocolate and creates the light, fluffy texture of chocolate mousse.

    Oh, another great thing about this recipe? It only requires one bowl (for melting the chocolate), and a blender/food processor for mixing the ingredients! That's it! It also only takes 5 minutes to make. Seriously, how much better can it get?


    I also made a graham cracker and oat crust. I did use butter in the crust, which is probably the least healthy part of this pie, but that can be avoided if you use Katie's recipe for pie crust (linked above). I added wheat germ to my crust to make it even healthier, but that's totally optional. If you don't want to make a homemade crust (although this recipe is quick and easy), feel free to use a prepared crust of your choice.

    This pie is DELICIOUS and I don't feel guilty at all about eating it. You have to try this!


    Healthy Chocolate Mousse Pie

    Filling: 
    • 1 package (about 12 oz.) silken or firm tofu (I used firm)
    • 1 teaspoon cocoa powder
    • 1 teaspoon vanilla extract
    • 2 tablespoons milk of choice (I used skim milk, but feel free to use a lactose-free milk such as soy, almond, etc.)
    • 1/8 teaspoon salt
    • 1½ cup chocolate chips, melted (I used milk chocolate, but feel free to use semi-sweet or even dark)
    • 2-3 tablespoons sweetener of choice (I used 2 tablespoons of brown sugar and 1 tablespoon of white sugar)
    • Optional: 1 tablespoon chocolate liqueur, Kahlua, etc. (when I make this again, I'm totally using Godiva liqueur!)
    Crust: 
    • 9 whole graham crackers
    • 1/2 cup old-fashioned oats
    • Optional: 1/4 cup wheat germ (If you add this, I recommend adding a tablespoon of water to keep the crust moist)
    • 3 tablespoons (packed) brown sugar
    • 1/8 teaspoon salt
    • 5 tablespoons unsalted butter, melted
    • 1 teaspoon vanilla extract
    1. Preheat oven to 350°F. Blend first 4 (or 5, if using wheat germ) ingredients in processor until graham crackers are finely ground. Add butter and vanilla and process until moist crumbs form. Press crumb mixture onto bottom and 1 inch up sides of 9-inch-diameter pie pan. Bake crust until deep golden brown, about 12 minutes. Cool. 
    2. Melt the chocolate (either on the stove or in the microwave), then throw everything into a food processor and blend until super-smooth. Pour into the chilled pie crust. Refrigerate until chilled; this gets firmer the longer it sits.
    Recipe for filling adapted from Chocolate-Covered Katie.
    Recipe for crust adapted from Epicurious.


    Pin It

    Monday 14 May 2012

    Coffee Ice Cream Dream Cake

    Pin It


    This cake was amazing. I think this ice cream cake is my favourite dessert I've ever made. It was insanely delicious and I craved it all day long for days on end. This cake gets better the longer it sits, so if you're serving for company, it would be great to make days ahead. The graham crackers absorb more of the coffee flavour and the cake just tastes better and better the longer it sits!

    The original recipe called for a bit of Kahlua mixed in the Cool Whip, but I used Godiva chocolate liqueur instead because that was what I had on hand. If you don't have either of these on hand or if you're just non-alcoholic, feel free to leave this out.

    Also, I only used 3 layers of graham crackers. I think the original recipe called for more layers, but mine turned out fabulously with only the 3 layers. Feel free to add more (or less) layers- it's all up to you. I also used about half of the amount of Cool Whip the original recipe called for (and just made more layers of ice cream). This is one of those super-versatile recipes, so have fun with it!

    I can't say enough good things about this recipe. It was seriously fabulous and ridiculously delicious. Not only that, but it's no-bake and really simple (albeit a bit messy) to put together. :)


    Kahlua-Coffee Ice Cream Dream Cake
    Yield: approx. 18 servings

    Note: these measurements are the ones I used. You can use more (or less) ingredients based on how many layers you want for your cake.
    • One 14-oz. box of chocolate graham crackers (about 21 crackers)
    • 3-4 cups coffee ice cream (set out 15 mins. to soften)
    • One 8 oz. container Cool Whip
    • 2 tablespoons chocolate liqueur (I used Godiva) or Kahlua (optional)
    • 10-12 oz. jar fudge topping/sauce
    • 1 cup Heath bits
    • 1 Symphony bar, chopped
    1. Line the bottom of a 13x9” pan with chocolate graham crackers (each layer should take 7 full grahams and 1 half graham).
    2. In a bowl, stir 3-4 cups of softened ice cream to loosen it.  Use an offset spatula to spread the ice cream over the graham crackers.  Top with another layer of grahams.
    3. Stir 2 tablespoons of liqueur of Kahlua into the entire amount of Cool Whip (again, this is optional). Spread over the graham crackers.
    4. Microwave the jar of fudge sauce for 20 seconds. Drizzle on half of the fudge over the Cool Whip layer. Sprinkle on the Heath bits.
    5. Repeat the layers (grahams, ice cream, grahams, Cool Whip, and fudge sauce), replacing the Heath bits with chopped Symphony bars on the top.
    6. Freeze several hours until set. (Note: A bench scraper is an easy way to cut down through the layers.)
    Recipe adapted from Bake at 350
    Pin It

    Sunday 13 May 2012

    Creamy Avocado Yogurt Dip

    Pin It


    Creamy avocados and tangy, light yogurt with a bit of tart lime juice... Yum!

    This is a great recipe, especially for summer. It's light, fresh, and full of flavour. I made this and served it with pita chips, and it was seriously addictive! I'm really getting into yogurt dips. They're tangy, light and healthy.

    Also, I recommend squeezing a bit of lime juice on the top if you aren't eating immediately: it keeps the avocados from browning. You could also omit the jalapenos if you'd like, because I found it was the slightest bit spicy (but definitely not "hot").

    This is a simple, healthy and delicious recipe. I will definitely be making this again!

    Creamy Avocado Yogurt Dip

    • 1/2 cup plain fat-free Greek yogurt
    • 2 ripe avocados, peeled and seeded
    • 1 clove garlic, minced
    • 3 tablespoons chopped fresh cilantro (I omitted)
    • 1 tablespoon finely chopped seeded jalapeño pepper
    • 2 tablespoons fresh lime juice
    • 1/4 teaspoon ground cumin
    • Salt and ground black pepper, to taste
    1. Blend all ingredients in a blender or food processor until smooth. Sprinkle with salt and pepper, to taste.
    2. Serve with pita chips, tortilla chips, and/or cut-up veggies such as carrots, celery, etc..
     Recipe adapted from Two Peas and Their Pod.


    Pin It

    Saturday 12 May 2012

    One-Bowl Death by Chocolate Cookies

    Pin It

    These cookies were insanely good. They were fudgy and chewy, like perfect brownies in cookie form. There were tons and tons of chocolate chunks, which I just loved. These really are a chocolate lover's dream! These are super easy and, as the title states, only require one bowl. Definitely a recipe that I will be making again and again!

    I used 1/4 cup measures to drop the cookies onto the baking sheet, and the cookies turned out huge! I will probably use large tablespoons to drop them next time-- reason being that next time, I won't be able to eat a huge cookie (which is really 2 normal cookies) by justifying that it's only ONE cookie. Because under that logic, I can eat up to three cookies and be able to justify it to myself-- which i just dangerous with these cookies.

    (Also: I'm sorry about the bad picture quality. I've been reading that natural light is best to take pictures, so I tried taking pictures outside on a sunny day. Bad idea. I guess you have to find a balance... I'm still learning!)


    Death by Chocolate Cookies
    Yield: approx. 1½ dozen cookies
    • 2 packages (8 oz. each) semi-sweet baking chocolate, divided (I used Baker's)
    • ¾ cup firmly packed brown sugar
    • ¼ cup butter
    • 2 eggs
    • 1 teaspoon vanilla
    • ½ cup flour
    • ¼ teaspoon baking powder
    1. Heat oven to 350 degrees. Coarsely chop 8 squares (1 package) of chocolate; set aside (these will be your chocolate chunks). 
    2. Microwave remaining 8 squares of chocolate in large microwavable bowl on high for 1-2 minutes. Stir until chocolate is melted and smooth.
    3. Stir sugar, butter, eggs & vanilla into melted chocolate. Stir in flour and baking powder. Stir in reserved chopped chocolate. 
    4. Drop by 1/4 cupfuls onto ungreased cookie sheets. Bake 12-14 minutes or until cookies are puffed and feel set to the touch. Cool on cookie sheet 1 minute. Transfer to wire rack to cool completely.
    Recipe adapted from Baker's.


    Pin It

    Friday 11 May 2012

    General Tso's Chicken

    Pin It

    I've only very recently begun to enjoy Chinese food. Actually, I should rephrase that: I've only recently begun to eat Chinese food. Sometimes I can be a bit of a picky eater, and I say that I don't like something because it's just different than what I'm used to (even if I've never tried it!). I'm trying (keyword: trying) to embrace new types of food. And I'm glad that I'm doing so, because it turns out I love Chinese food. My favourite dish is General Tso's chicken. Crispy, fried pieces of chicken in a tangy and sweet sauce... you really can't go wrong in my book.

    I loved this recipe. It was more "traditional" than simply a sweet and sour sauce. My two little sisters are really picky and didn't like this sauce-- I think they were expecting a sweet and sour sauce (which I'll make for them next time-- I think I'll use this recipe for Sweet and Sour Chicken from Addicted to Recipes). I, on the other hand, loved it. The inclusion of the hoisin sauce gave the chicken a unique flavour: it was tangy and sweet, but had a unique flavour that I can't really describe from the hoisin sauce.

    I didn't deep fry my chicken pieces-- I didn't have enough oil. Instead, I used a large frying pan and poured the oil in til there was about a 1/2 inch of oil. I just flipped the pieces of chicken once and got them nice and crispy on each side, and they were perfectly cooked. The pieces of chicken still fried beautifully and were nice and crispy, but juicy on the inside.

    This is definitely a recipe I'll make again!


    General Tso's Chicken
    Yield: 4-5 servings

    Marinade:
    • 1/2 cup hoisin sauce
    • 1/4 cup white vinegar
    • 3 tablespoons soy sauce
    • 3 tablespoons sugar
    • 2 tablespoons cornstarch
    • 1 1/2 cups water
    • 4 boneless, skinless chicken breasts (about 1 1/2 pounds)
    • 1 tablespoon vegetable oil
    • 4 garlic cloves, minced
    • 2 tablespoons grated fresh ginger
    • 1/2 teaspoons red pepper flakes (I omitted these)

    Coating & frying:
    • 3 large egg whites
    • 1 1/2 cups cornstarch
    • 1/2 cup unbleached all purpose flour
    • 1/2 teaspoon baking soda
    • 4 cups vegetable oil (I didn't use this much oil, read above)
    • 1-2 green onions, thinly sliced for garnish (optional)
    1. Prep the chicken breasts by cutting them into 1 inch pieces.
    2. To make the marinade & sauce, whisk the hoisin, vinegar, soy sauce, sugar, cornstarch, and water in a bowl. Of this mixture, place 6 tablespoons into a zip lock storage bag and add the chicken; seal and refrigerate for 30 minutes. Set aside the remaining marinade in the bowl.
    3. While the chicken is chilling in the marinade, heat the oil in a large skillet over medium heat until shimmering. Sauté the garlic, ginger and red pepper flakes until fragrant. Add 2 cups of the hoisin marinade to the skillet and simmer, whisking constantly, until the mixture is dark brown and thickened. Remove from heat, cover and keep the sauce warm.
    4. To prepare the chicken coating and frying, whisk the egg whites in a shallow dish until foamy; set aside. Combine the cornstarch, flour, baking soda, and remaining hoisin marinade in a second shallow dish; mix until it resembles coarse meal. 
    5. Remove the chicken from the refrigerator and from the marinade. Pat the marinated chicken dry with paper towels. Toss half the chicken into the foamy egg whites until well coated, then dredge the chicken in the cornstarch mmixture, pressing to adhere. Transfer the coated chicken to a plate and repeat with the remaining chicken.
    6. Heat the oil in a Dutch oven over medium high heat until the oil registers 350 degrees. Fry half the chicken until golden brown, about 3 minutes, turning each piece halfway through cooking. Transfer the cooked chicken onto a paper towel lined plate to drain. Return the oil to 350 degrees before frying again. Repeat with the remaining chicken.
    7. Warm the sauce over medium heat until simmering. Place the sauce in a large bowl and add the fried chicken pieces. Toss to coat and serve. 
    Recipe adapted from What's Cookin', Chicago?
    Pin It

    Wednesday 9 May 2012

    Chocolate Chip Cookie Dough Brownies

    Pin It

    I've been seeing egg-free cookie dough recipes all over the food blogging world lately. I always loved to taste the dough whenever I make cookies, brownies, or cakes, so I thought I'd try it out. Brown Eyed Baker had a great idea to put cookie dough on top of brownies. I loooove brownies so I knew I had to try this recipe!

    I actually had a totally idiotic moment when baking these brownies. The recipe called for one cup of butter as well as 3/4 of a cup. I was under the assumption that one cup = one stick of butter. So I used a 1/2 cup of butter for the brownies and 3/8 of a cup of butter for the cookie dough. Logically, I know that one stick of butter is half of a cup but I wasn't thinking (which often happens). They actually turned out pretty well! The brownies weren't dry at all, especially with the cookie dough on top. The cookie dough was a bit grainy from the sugar and definitely could have used that extra 3/8 cup of butter to make it a bit creamier.

    I would have re-made these brownies with the correct amounts of butter, but my family really wasn't crazy about them. They all said the brownies were good, but the cookie dough was too much and made the brownies too rich. I personally liked it, but I'm not going to make a batch of brownies just for myself! If you're one of those people who likes cookie dough and the trend of cookie dough dips, you should definitely try these brownies!


    Chocolate Chip Cookie Dough Brownies

    For the Brownies:
    • 4 ounces unsweetened chocolate, finely chopped
    • 1 cup unsalted butter, at room temperature
    • 2 cups light brown sugar
    • 4 eggs
    • 2 teaspoons vanilla extract
    • 1 cup all-purpose flour

    For the Cookie Dough:
    • ¾ cup unsalted butter
    • ¾ cup light brown sugar
    • ¾ cup granulated sugar
    • 3 tablespoons whole milk
    • 1½ teaspoons vanilla extract
    • 1½ cups all-purpose flour
    • 1½ cups mini chocolate chips
    1. Preheat oven to 325 degrees F. Line a 9×13-inch pan with foil, with enough to hang over all four sides. Butter the foil. 
    2. In a medium glass bowl, melt the chocolate in the microwave in 30-second increments, stirring after each, until melted and smooth. Set aside to cool slightly. 
    3. In a large mixing bowl, mix the butter and brown sugar with an electric mixer on medium speed until light and fluffy. Beat in the eggs and vanilla extract, scraping the bowl as needed. Mix in the melted chocolate until combined. Reduce the speed to low, add the flour and mix just until combined (don’t over-mix). Spread the batter into the prepared pan. Bake 25 to 35 minutes, or until a toothpick inserted into the center comes out clean. Let cool completely.
    4. In a medium bowl, use an electric mixer on medium speed to combine the butter and both sugars. Add the milk and vanilla and mix until combined. Reduce the speed to low and mix in the flour just until combined. Using a rubber spatula, stir in the chocolate chips.
    5. Spread the cookie dough over the cooled brownies. Refrigerate until the dough is firm, about an hour. Use a sharp knife to cut the brownies. Store the brownies in an airtight container at cool room temperature or in the refrigerator.

    Recipe from Brown Eyed Baker.
    Pin It